Step 1: Initialize the Default Main Branch
Navigate to Azure DevOps:
Go to Azure DevOps and sign in with your credentials.
SelectYour Project:
Choose Project1 from your list of projects.
Initialize the Main Branch:
Go to Repos > Files.
If the main branch does not exist, you will see an option to initialize it. Click on Initialize and follow the prompts to create the main branch1.
Step 2: Install the Microsoft Security DevOps Extension
Navigate to Extensions:
In Azure DevOps, click on the Shopping Bag icon in the top right corner and select Browse Marketplace.
Search for the Extension:
Search for Microsoft Security DevOps.
Install the Extension:
Click on Get it free.
Select your organization (User1-42147509) and click Install.
Follow the prompts to complete the installation2.
Step 3: Create a New Starter Pipeline
Navigate to Pipelines:
Go to Pipelines > New pipeline.
Select the Repository:
Choose Azure Repos Git and select the relevant repository.
Configure the Pipeline:
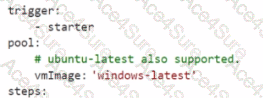
Select Starter pipeline and replace the default YAML with the following starter code:
trigger:
- starter
pool:
vmImage: 'windows-latest'
steps:
- task: MicrosoftSecurityDevOps@1
inputs:
command: 'run'
policy: 'azuredevops'
publish: true
Save the Pipeline:
Click on Save and enter starter as the branch name.
Click on Save and run to save the pipeline to the new branch named starter3.
By following these steps,you will have successfully initialized the main branch, installed the Microsoft Security DevOps extension, and created a new starter pipeline named starter1 that includes the specified task